×
Menu
Index

Render Thumbnails Preferences

Render Thumbnails Preferences

1

Settings for rendering 3d Models


2

View preset

2. View preset
 
 
You can manually setup a view for render the thumbnail, dependent on model orientation in a scene.
As a rule the models are oriented to Front.
In that case you can use a default view setting - top-front-right.
For use the default view point of scene, without changes, turn on the checkbox “Use default scene view”.
But for reassigning the orthographic views (Top, Front, Right, Left) you can turn on the checkbox "Override Orthographic Views".

3

Renderer Setup

3. Renderer Setup
 
Choice and configuring the renderer plugin.
Your library can contains a models and materials which are prepared for for using with different plugins of rendering.
The utility can automatically define the compatibility* of your model and material with plug-in renderer.
The utility comes with four render-preset files - for Scanline, Mental Ray, Octane and Vray renderers.
If you use any other renderer, you can configure and save custom render-preset for use with the utility .**

Use scene/studio Renderer:

    Set selected  renderer as default    
 
List of availabled renderers 
 
                        Link renderer to render preset file
 
    List of render preset files
 
    Add new render preset file to list
 
    Remove render preset file from list
 
    Use render settings from the file of model.


*Compatibility of the model to renderer determinates by the materials used in the model.
For example, “Vray Material” is compatible only to the Vray render, or “Arch & Design (mi)” to the Mental Ray render.
** Do not save your render settings over the render-preset files which are the utilyty components. Otherwise
these savings will be deleted while the installation of the new version of the utility.

4

Custom studio

4. Custom studio


Use custom studio:

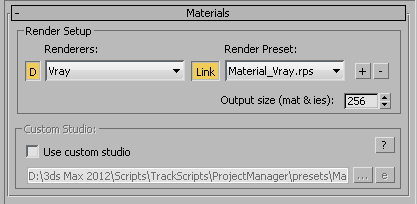
check for using custom studio for rendering preview.
Set path to studio
 
      Open the studio file for edit.
 
    Open the window with description how to customize studio.
 

The program creates the studio while rendering of models and materials by default, but you may create your own file with the studio*,
where your models will be rendered in.
To activate the ability to create the Custom Studio turn on the checkbox “Use Custom Studio”.
Pay attention, that the settings of the “View Presets” will become unavailable.
The Custom Studio has to contain the camera and the object with the name “SceneDummy” for the correct rendering. (For the Materials renderings the object’s name should be “MaterialDummy”).
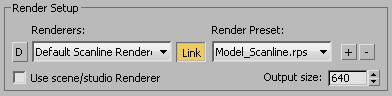
Set the equal size of the final image in the dialog window “Render Setup” and turn on “Safe Frame” in the viewport.
Set the desired view by the object “SceneDummy” or “MaterialDummy”.
For additional see the files “Sample_Studio.max” and “Material.max” which go with the utility.

*The textures of the materials may appear uncorrect with the mapping by the channel different from 1 when using the Custom Studio.
Also at rendering of multi-materials the materials with the ID more then 1 will be ignored.

5

Settings for rendering Materials

5. Settings for rendering Materials
 

Render output settings.

6

Override output gamma

6. Override output gamma
 
7

Save as type

7. Save as type  The image can be saved as ".png" with alpha channel or ".jpg".